You’ve got an old wooden dresser, bookshelf, or cabinet that’s seen better days. The finish is scratched, the color is dated, and replacing it feels like a waste. Then you see those sleek, modern vinyl-wrapped furniture pieces online-smooth, glossy, and surprisingly affordable. You wonder: can you put vinyl wrap over wood? The short answer is yes-but only if you do it right. Skip the prep work, and you’ll end up with bubbles, peeling edges, and a mess that’s worse than the original.
Why Vinyl Wrap Works on Wood
Vinyl wrap isn’t just for cars anymore. It’s become a go-to solution for furniture restorers, DIYers, and even small furniture shops. The material is flexible, durable, and comes in hundreds of finishes-from matte black to walnut grain to high-gloss white. When applied correctly, it covers imperfections, hides stains, and gives old wood a brand-new look without sanding down to bare timber. The key reason it works on wood is surface stability. Unlike particleboard or MDF, solid wood doesn’t expand and contract wildly with humidity changes. That means once the surface is sealed and smooth, vinyl wrap sticks reliably for years. Many people use it on wooden TV stands, cabinets, and storage units because it’s faster and cheaper than repainting or refinishing.What Kind of Wood Works Best
Not all wood is created equal when it comes to vinyl wrapping. Here’s what you need to know:- Hardwoods like oak, maple, and walnut are ideal. They’re dense, stable, and hold a smooth finish well.
- Softwoods like pine or cedar can work, but they’re more prone to knots and resin bleed. You’ll need extra sealing.
- Engineered wood (MDF, plywood) is actually easier to wrap than solid wood because it’s flat and consistent. Just make sure it’s not water-damaged.
- Particleboard or cheap fiberboard? Avoid it. These materials swell when exposed to moisture, and vinyl wrap will peel as soon as the substrate gives way.
If your piece has visible grain or deep scratches, don’t worry-vinyl wrap hides them. But if the wood is warped, cracked, or rotted, no amount of wrap will fix structural damage. Fix the frame first. Then wrap.
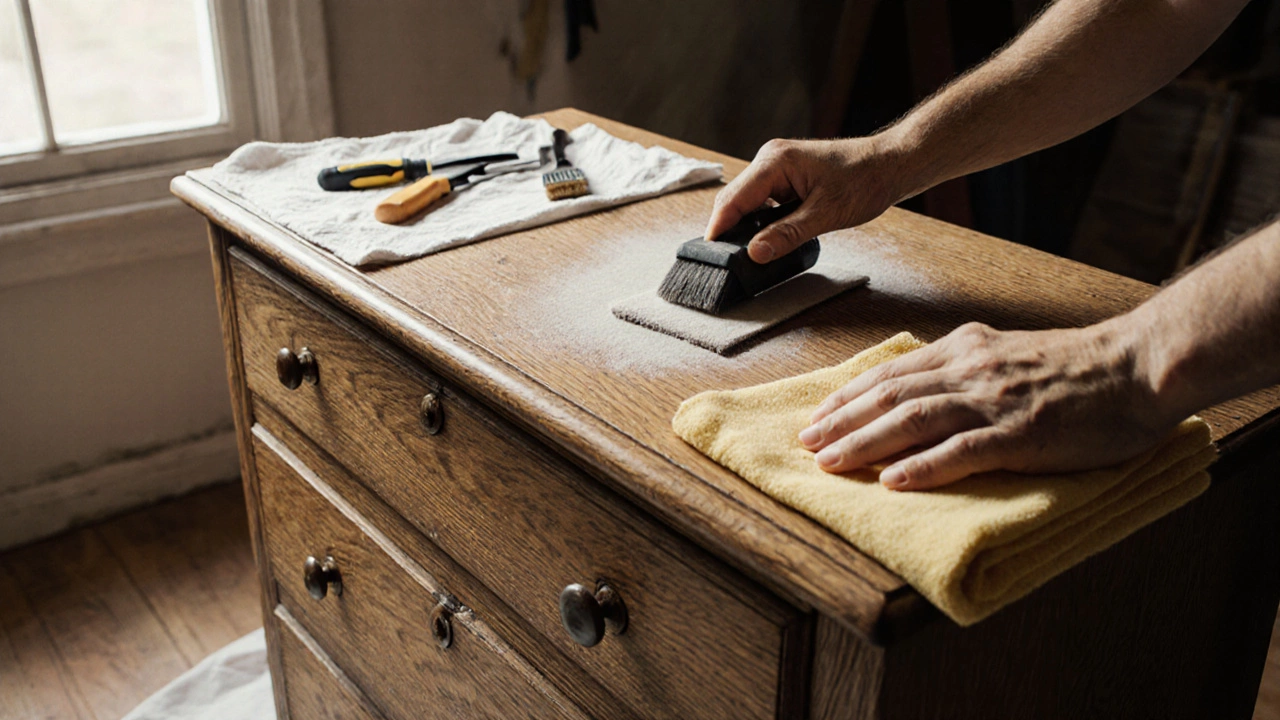
Prep Work: The 5 Steps You Can’t Skip
Vinyl wrap won’t stick to dust, grease, or old varnish. If you skip prep, you’re setting yourself up for failure. Here’s the exact process that works:- Remove hardware. Take off handles, knobs, hinges. Keep them in a labeled bag. You’ll reattach them later.
- Clean thoroughly. Use a degreaser like TSP (trisodium phosphate) or a mixture of dish soap and warm water. Scrub every surface, especially corners and edges. Let it dry completely.
- Sand lightly. Use 120- to 180-grit sandpaper to remove gloss and create a tooth for the adhesive. Don’t go crazy-you’re not stripping the wood, just dulling the surface. Wipe away dust with a tack cloth.
- Seal the wood. Apply one coat of water-based polyurethane or a dedicated vinyl wrap primer. This prevents tannins from bleeding through and gives the adhesive something to grip. Let it cure for 24 hours.
- Measure and plan. Use masking tape to mark where the vinyl will go. Cut your wrap 2-3 inches larger than each panel. You’ll trim excess after application.
Skipping even one of these steps is why most DIY attempts fail. People think they can just slap vinyl on an uncleaned dresser and call it done. It won’t last. Trust the process.
Choosing the Right Vinyl Wrap
Not all vinyl is made the same. You need automotive-grade or furniture-grade wrap, not cheap craft vinyl from the dollar store. Look for these features:- Thickness: 3-5 mil is ideal. Thinner wraps tear easily; thicker ones are harder to maneuver around curves.
- Adhesive type: Choose pressure-sensitive, removable adhesive. Avoid permanent glue-it’ll damage the wood if you ever want to remove it.
- Finish: Matte, satin, gloss, or textured? Pick based on your style. Matte hides fingerprints best. Gloss looks modern but shows every smudge.
- Pattern: If you want wood grain, make sure it’s high-res and realistic. Low-quality prints look fake under natural light.
Brands like 3M, Avery Dennison, and Oracal have reliable products. For furniture, Oracal 970RA (removable adhesive) is a favorite among pros. It’s rated for indoor use, UV-resistant, and can be repositioned during installation.
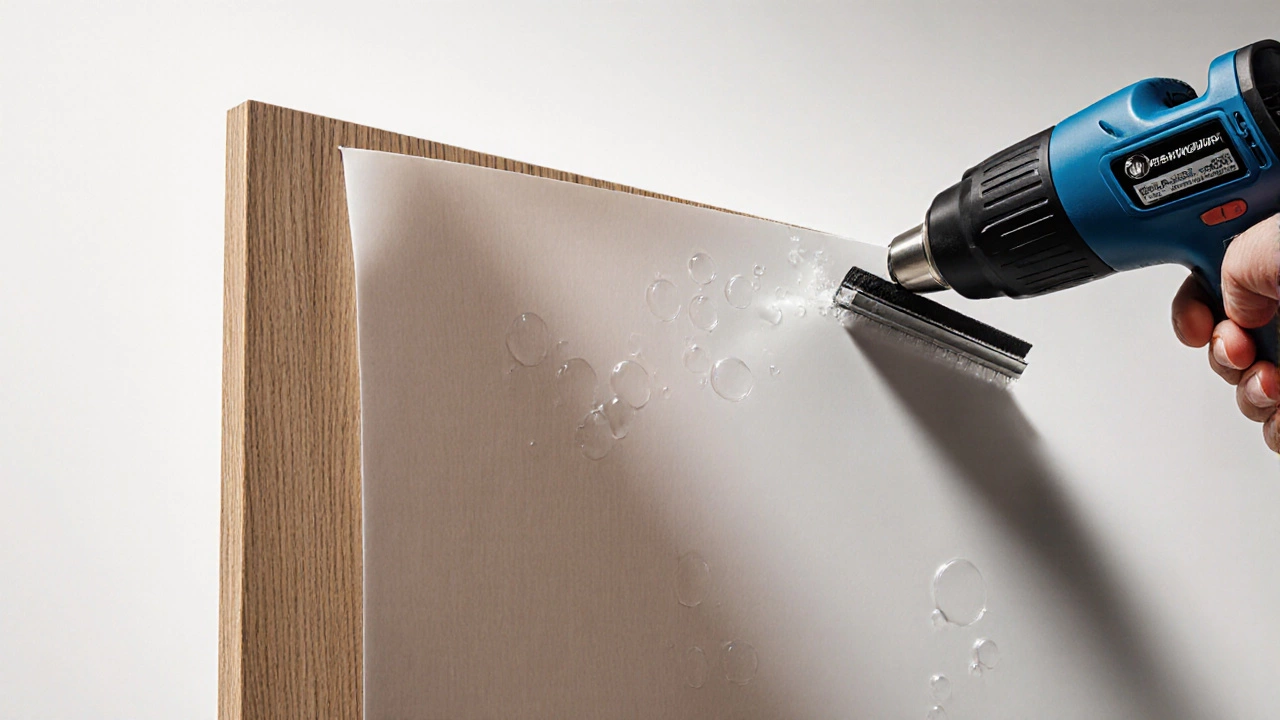
Application Tips That Make All the Difference
Now comes the actual wrapping. Here’s how to get a factory-smooth finish:- Work in a clean, dust-free room. Close windows. Turn off fans.
- Use a heat gun or hair dryer on low to soften the vinyl as you apply it. This helps it conform to edges and corners.
- Start from the center of each panel and work outward. Use a squeegee (a credit card works in a pinch) to push out air bubbles.
- For inside corners, make small relief cuts-don’t stretch the vinyl. Stretching causes lifting later.
- Overwrap edges slightly. Trim with a sharp utility knife after the wrap cools. This seals the edges and prevents peeling.
- Let the wrap settle for 48 hours before using the furniture. Adhesives need time to fully bond.
People rush this part. They use too much heat, pull too hard, or don’t seal the edges. The result? A beautiful wrap that starts curling at the corners after three months. Slow down. Precision beats speed every time.
How Long Does Vinyl Wrap Last on Wood?
With proper prep and care, a vinyl-wrapped wood surface can last 7-10 years. Some professional installations last longer. Factors that affect longevity:- Humidity: High moisture (like in bathrooms) can cause adhesive failure. Use waterproof vinyl if wrapping near sinks or in kitchens.
- UV exposure: Direct sunlight fades colors over time. Keep wrapped furniture away from south-facing windows if possible.
- Cleaning: Wipe with a damp cloth and mild soap. Never use abrasive cleaners, ammonia, or bleach.
- Physical damage: Sharp objects can puncture vinyl. Use felt pads under heavy items.
One homeowner in Birmingham wrapped a 1980s oak storage cabinet with a matte white vinyl. Five years later, it still looks new-no peeling, no fading. She cleans it weekly with a microfiber cloth. That’s the secret: low maintenance, high reward.

Can You Remove Vinyl Wrap Later?
Yes-and that’s one of its biggest advantages. Unlike paint, vinyl wrap is designed to be removable. Here’s how:- Heat the surface gently with a hair dryer or heat gun.
- Peel slowly at a 45-degree angle, starting from a corner.
- If adhesive residue remains, use rubbing alcohol or a dedicated adhesive remover.
- Wipe the surface clean. The original wood finish underneath will be intact.
This makes vinyl wrap perfect for renters, people who like to change styles often, or anyone unsure about committing to a permanent change. You’re not painting over history-you’re protecting it.
When Not to Use Vinyl Wrap on Wood
There are limits. Don’t wrap wood if:- The surface is still damp or has active rot.
- The wood is heavily stained with oil, smoke, or water damage.
- You plan to stain or paint the wood later-vinyl wrap makes that nearly impossible.
- The piece is used daily for heavy storage (like a filing cabinet with 50 lbs of documents). The constant pressure can cause adhesive fatigue.
If you’re looking for a permanent, structural upgrade, consider refinishing with lacquer or paint. But if you want a quick, reversible, and stylish refresh? Vinyl wrap is your best bet.
Final Thoughts: Is It Worth It?
Putting vinyl wrap over wood isn’t magic. It’s craftsmanship. It takes time, patience, and attention to detail. But the payoff? You get a custom-looking piece of furniture for under £100 in materials-no sanding, no primer, no fumes, no waiting weeks for paint to dry.It’s especially smart for storage furniture: dressers, cabinets, shelves, TV stands. These pieces are often large, plain, and easy to cover. A vinyl-wrapped dresser can look like it cost £800, when you spent £120. That’s the power of smart refinishing.
Don’t be fooled by YouTube videos that make it look easy. It’s not. But if you follow the steps, respect the prep, and use quality materials, you’ll end up with something that looks professional-and lasts.
Can you put vinyl wrap over stained wood?
Yes, you can wrap over stained wood, but only after proper prep. Clean the surface, lightly sand to remove gloss, and seal with a water-based polyurethane. This prevents the stain from bleeding through and ensures the vinyl sticks properly. Skipping sealing can cause discoloration or peeling over time.
Does vinyl wrap hide scratches on wood?
Yes, vinyl wrap covers minor to moderate scratches very well. Deep gouges or dents may still show through if they’re too pronounced. Light sanding helps smooth the surface before wrapping, but the vinyl itself acts like a skin that hides surface flaws. For best results, use a matte or textured vinyl-it masks imperfections better than glossy finishes.
Can you wrap wood furniture in a humid room?
You can, but you need to use waterproof vinyl wrap and seal all edges carefully. Humidity causes wood to expand and contract, which can pull the vinyl away from corners. Choose a wrap rated for high-moisture environments and avoid placing wrapped furniture directly against showers or sinks. Regular ventilation helps too.
Is vinyl wrap better than paint for wood furniture?
It depends. Vinyl wrap is faster, mess-free, and reversible. Paint gives you more color control and lasts longer if applied professionally. But paint requires sanding, priming, multiple coats, and days of drying. Vinyl wrap can be done in a weekend with no fumes. For renters or people who change styles often, vinyl wins. For permanent, high-traffic pieces, paint may be better.
What’s the cheapest way to wrap wood furniture?
The cheapest way is to buy a roll of budget-friendly automotive vinyl wrap (like 3M 2080 or similar) from online retailers. Avoid craft vinyl-it’s not durable. You’ll also need a heat gun, squeegee, and utility knife. Total cost for a small cabinet: £50-£80. That’s less than a can of paint and primer, and you get a professional finish without the hassle.
If you’re looking to upgrade your storage furniture without buying new, vinyl wrap is one of the smartest, most underrated options out there. It’s not just a trend-it’s a practical, long-term solution that’s been used by professionals for years. You don’t need to be an expert. Just follow the steps, take your time, and you’ll end up with something you’re proud to show off.
Write a comment